
Nevertheless, this doesn't have to be a problem ... when you use a few tricks.
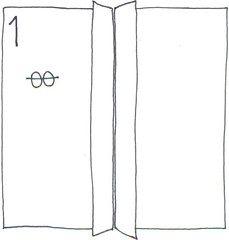
1. Put the two pieces where the zipper should be right sides together and stitch them together at 1 cm (or the indicated seam allowance). For the pleated skirt, these two pieces are the two short sides of the fabric. Iron the seams.
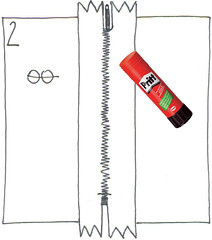
2. Put the zipper right side up and put some glue next to the zipper's teeth. Glue the zipper against the wrong side of the fabric (the zipper should lay flat by putting the slider upwards). When glueing, you have to align the top side of the zipper at 1 cm distance of the fabric side. Then gently unfold the zipper downwards, with the middle of the zipper's teeth neatly aligned with the seam. Press with your fingers and let it dry for a moment. Use a pin to mark where you have to stop sewing.
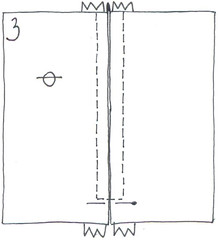
3. Turn over your fabric, right side up. Change the regular foot to a zipper foot and start sewing to the right of the zipper. Go all the way down where you turn your fabric 90°, sew over the zipper, turn 90° again and finish at the top of the zipper.
If you want, you can use a chalk marker in step 1 to put a parallel line to the left and right seam to make sure you stitch in a straight line.
Gently remove the stitches of step 1 with a seam ripper.

Thanks for the tutorial! I saw this skirt in mejsesmamma and just loved it! She told me to check it out on your blog! Glad I did! love your colourful fun stuff!
ReplyDeleteBarbara